YData MCP with Databricks Genie
This tutorial deploys the YData MCP server as a Databricks App and connects it to Genie Code, the Databricks assistant in notebooks. Once it is set up, you describe the data you need in Genie Code and it trains and samples synthesizers through the server:
"Create a synthetic customers and orders database: 500 customers and 3,000 orders. Each order belongs to a customer, has quantity and unit price, and line_total = quantity × unit price."
The setup also installs the ydata-synthetic-data skill and a set of template notebooks. With them, Genie Code writes correct ydata-sdk code for notebooks on a cluster, not only tool calls.
You run the setup on your own computer, from the installation folder. It
signs in to your Databricks workspace with your own credentials (OAuth) and
creates everything on your behalf. Each make step asks for the information it
needs.
Time: around 10 minutes to enable YData MCP Server and YData Skills in your Genie Workflow.
Follow the sections in order; each one ends with what you should see before moving on:
- Before you start: what to install and what to have at hand.
- Deploy the MCP server: run the setup from your computer.
- Create the compute: a cluster with ydata-sdk, for notebooks.
- Connect Genie Code: add the server and check the skill.
- Use it: first prompts.
- Stop the App: when you are done.
Image: overview of the setup (your computer → Databricks App → Genie Code)
1. Before you start
Download YData MCP Databricks Genie from GitHub
The package is available under KPMG EMU Github instance, with the project name ydata-mcp-databricks-genie. Make sure you download the zip first before moving forward with the next steps.
If you don't have access to the Github Instance, please submit a request ticket through Core.
On your computer
| What | Check | Install |
|---|---|---|
| Python 3.10–3.14 | python3 --version |
brew install python@3.12 |
| make | make --version |
xcode-select --install |
| Databricks CLI | databricks --version |
brew tap databricks/tap && brew install databricks |
| What | Check | Install |
|---|---|---|
| Python 3.10 or later | py --version |
python.org installer, or winget install Python.Python.3.12 |
| Databricks CLI | databricks --version |
winget install Databricks.DatabricksCLI, or the zip from GitHub releases |
make is not needed on Windows: each step is run with
.venv\Scripts\python mcp_setup.py <step> instead (see
Deploy the MCP server).
The Databricks CLI is required: make login uses it to sign in. Official
installation guides:
Databricks on AWS ·
Azure Databricks.
In the workspace
- Permission to create Databricks Apps.
- Genie Code, with Agent mode and MCP servers available. If the Genie Code settings have no MCP Servers section, a workspace admin has to enable it under Settings > Previews.
- Permission to create a cluster, for section 3.
Information the steps ask for
| Asked by | What | Example |
|---|---|---|
make wheel |
Your KPMG JFrog email and access token | token from your JFrog profile |
make login |
Workspace URL, from the browser's address bar | https://adb-<workspace-id>.<n>.azuredatabricks.net |
make login |
Profile name | ydata-oauth |
make login |
Sign-in method | 1 (OAuth, recommended) |
make deploy |
App name | mcp-ydata |
make deploy |
Where to install the skill | 1 (only you) |
make grant |
Groups that may use the server | data-science |
Press Enter to accept the value in brackets. Non-secret answers (JFrog email,
workspace URL, profile, app name) are saved in .mcp_setup.json, so later
steps and runs don't ask again. Tokens are typed into hidden prompts and never
saved.
2. Deploy the MCP server
Run every command from the installation folder, in a terminal (macOS/Linux) or
PowerShell (Windows). On Windows, replace make <step> with
.venv\Scripts\python mcp_setup.py <step>, and create the environment in
step 2.1 as shown in its Windows tab.
Shortcut
make install followed by make all runs steps 2.1 to 2.6 in one go,
asking the same questions. Read the steps below anyway: they say what each
question means and what you should see.
2.1 Install the local environment
Creates .venv/ with databricks-sdk and databricks-mcp.
Expected: Environment ready: .venv
2.2 Get the ydata-sdk wheel
If wheels/ydata_sdk-3.21.0-py3-none-any.whl is already there, the step uses
it. Otherwise it asks for:
- your KPMG JFrog email;
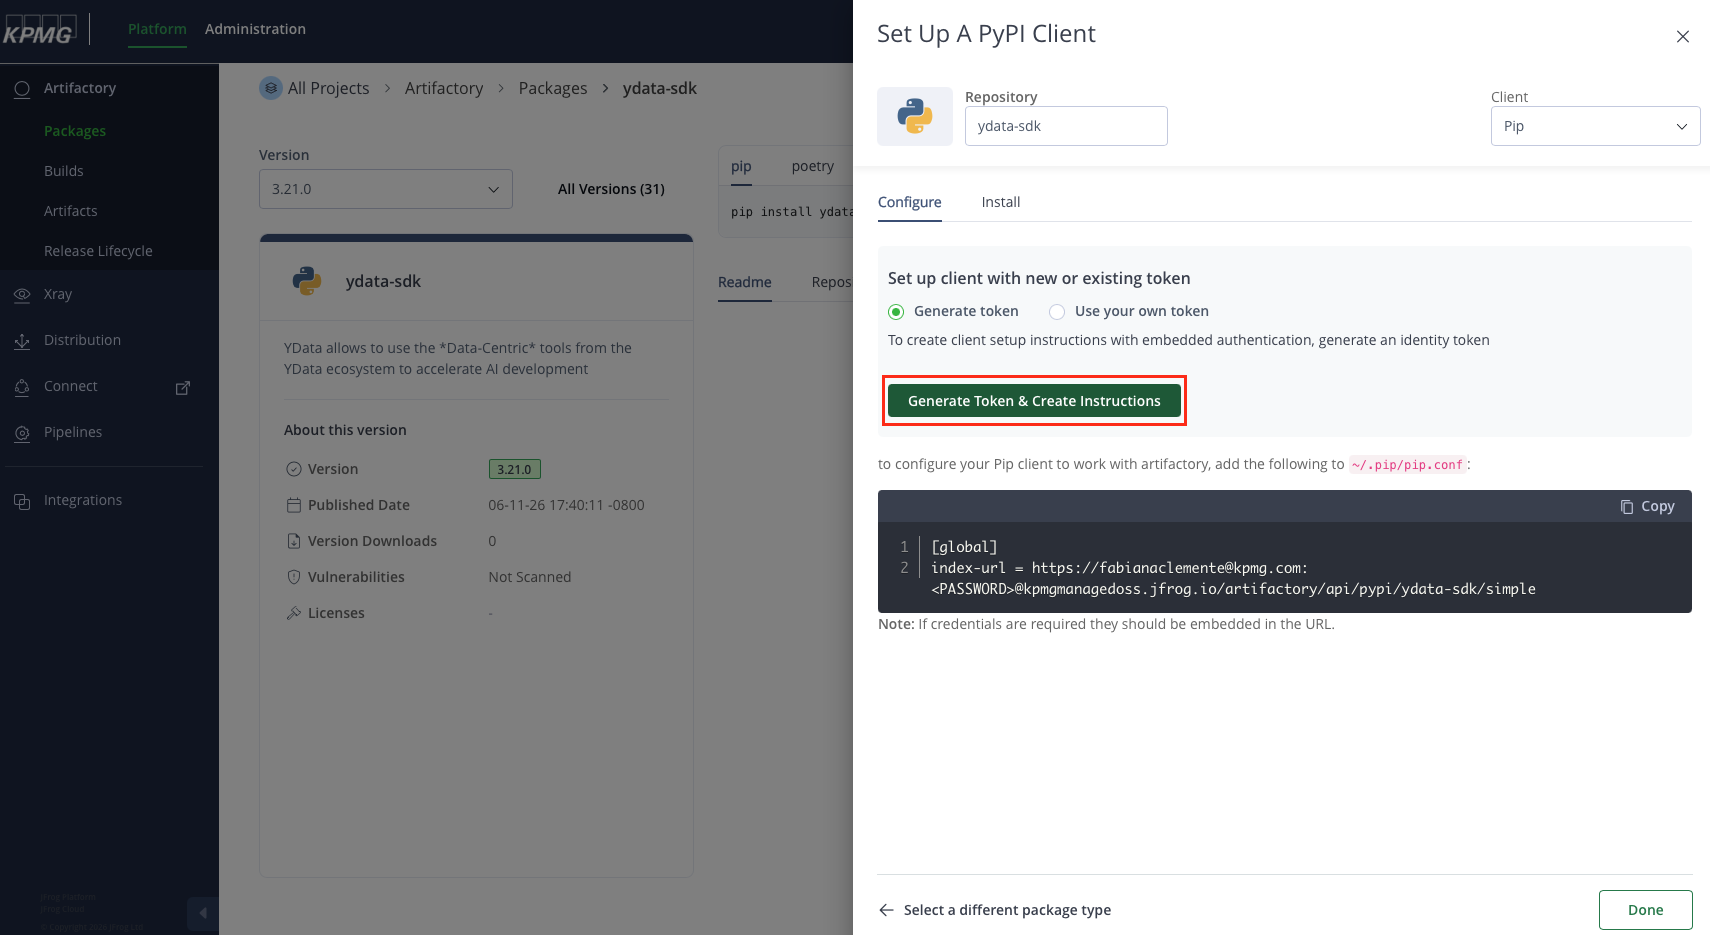
- a JFrog access token (hidden prompt). Create one in JFrog under your profile > Edit profile > Generate an identity token.
and downloads only that wheel (--no-deps) from the KPMG JFrog index. The
email is saved for the next upgrade; the token is not.
Expected: Using wheels/ydata_sdk-3.21.0-py3-none-any.whl.
The App runs on its own compute and cannot see cluster libraries, which is why it gets its own copy of the wheel.
Image: generating an identity token in JFrog
2.3 Sign in to the workspace
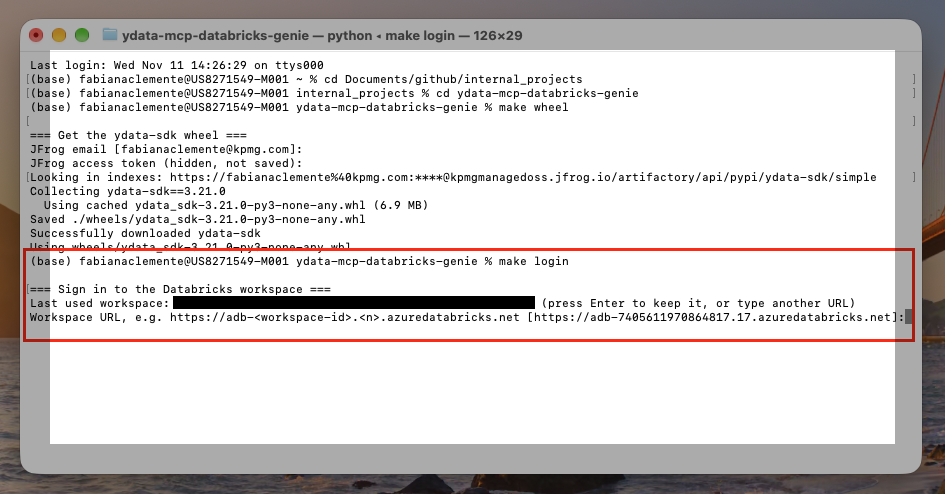
Asks for the workspace URL, a profile name and the sign-in method:
- 1, OAuth (recommended): a browser window opens and you sign in. Tokens refresh by themselves.
- 2, personal access token: enough to deploy, but
make toolsandmake testneed OAuth: Databricks Apps accept only OAuth for MCP calls. - 3, already configured: reuses an existing profile of that name.
Expected: Signed in as <you> (profile 'ydata-oauth').
Image: the OAuth sign-in page opened by make login
2.4 Create and deploy the server
Asks for the app name (default mcp-ydata; it must start with mcp-) and
where to install the skill. It then:
- uploads
app/app.py,app/app.yaml,app/requirements.txtand the wheel to/Workspace/Users/<you>/mcp-ydata/; - creates the App, the first time only;
- deploys it and waits until it is running. The first deploy installs the dependencies and takes a few minutes;
- builds the
ydata-synthetic-dataskill from the same wheel and uploads it, with the template notebooks; - lists the tools the server exposes.
Expected: Deployed: https://mcp-ydata-....databricksapps.com/mcp,
Skill uploaded, Template notebooks uploaded, then 19 tools: [...].
Run make deploy again whenever you switch to a new wheel. The App and its
permissions are kept, so Genie Code does not need to be set up again. To
update only the skill and templates, without redeploying, run make skill.
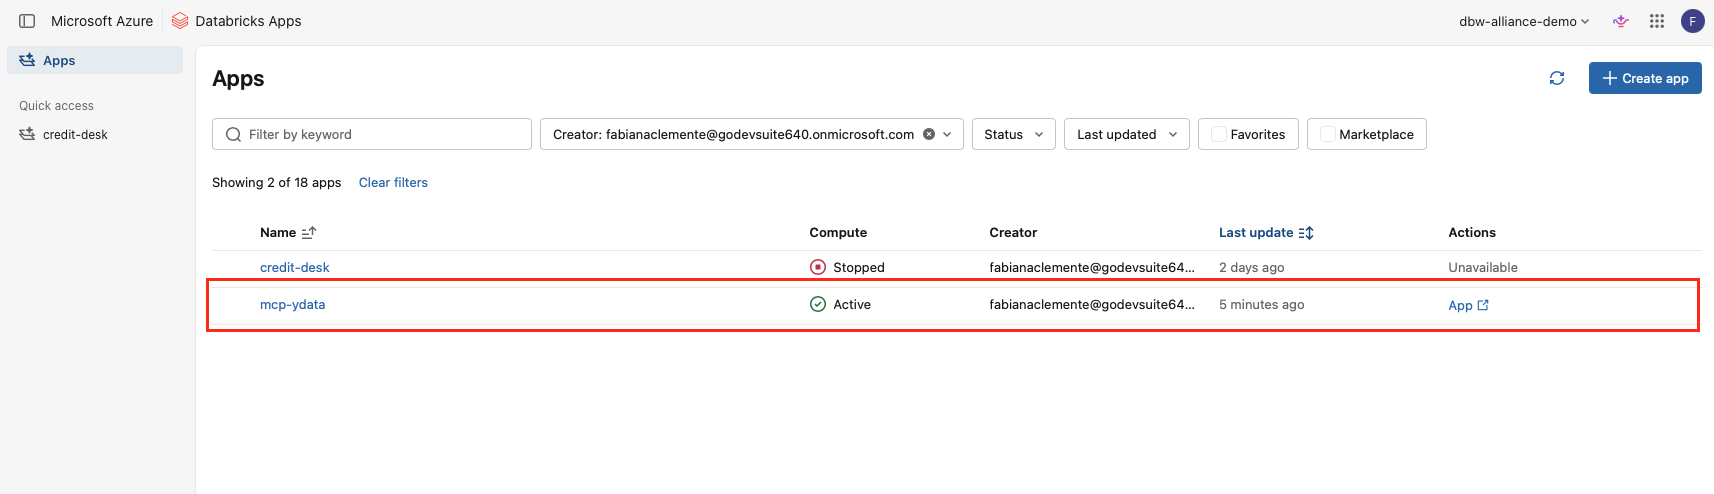
Image: the mcp-ydata App running under Compute > Apps
2.5 Test the server
Calls the server the way Genie Code does: train_faker_synthesizer with a
three-column config, get_job_status until the job finishes, then
sample_faker_synthesizer for 100 rows.
Expected: OK: sampled [100, 3] with columns ['name', 'age', 'city']
2.6 Give access to other users (optional)
Asks for groups, comma-separated, and gives each one Can Use on the App. Press Enter to skip. You own the App, so you already have access. Each user then follows section 4 in their own Genie Code.
3. Create the compute with ydata-sdk installed
The App covers tool calls. For notebooks, jobs, Unity Catalog tables, PDF reports and documents, you also need a cluster with ydata-sdk. Genie Code uses this cluster when it writes code from the skill and the templates.
Create the cluster
- Go to Compute > Create compute.
- Choose Single node and access mode Dedicated. Keep the default runtime.
-
Under Advanced > Spark > Environment variables, add the JFrog index, so the cluster's pip can install ydata-sdk:
PIP_EXTRA_INDEX_URL=https://<email>:<token>@kpmgmanagedoss.jfrog.io/artifactory/api/pypi/ydata-sdk/simpleUse the same JFrog email and access token as in step 2.2. Write the
@in your email as%40, for examplejane.doe%40kpmg.com. -
Click Create compute.
Install ydata-sdk on the cluster
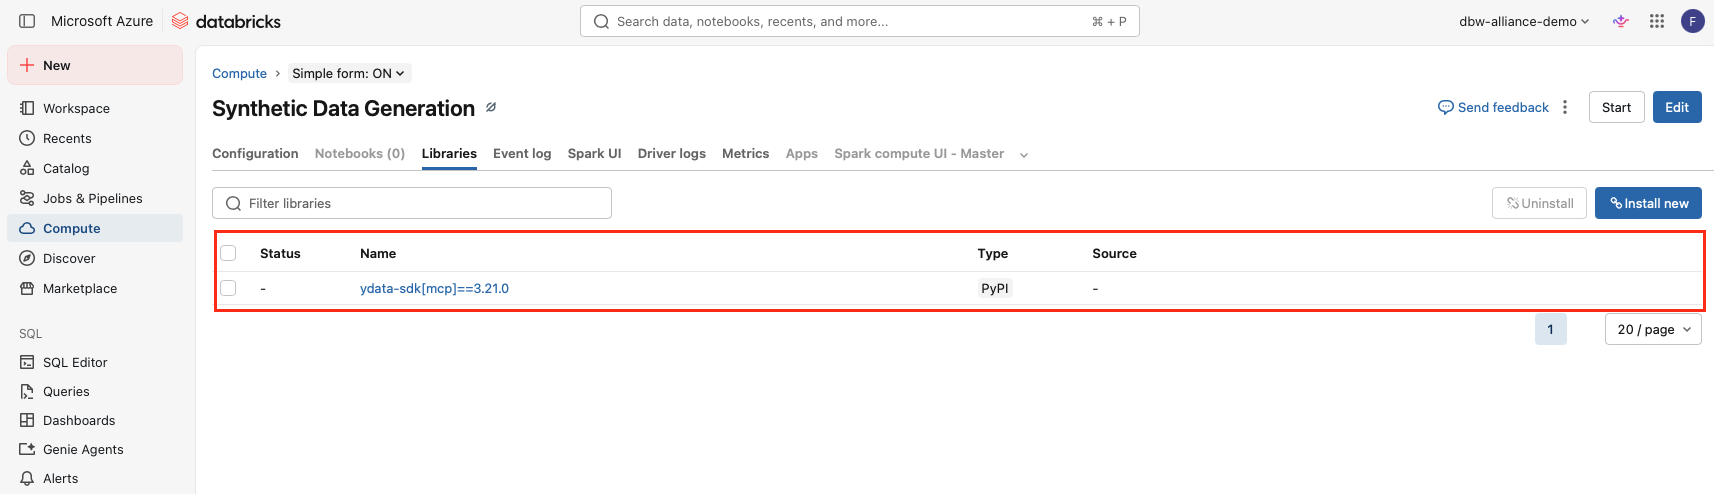
- Open the cluster, then Libraries > Install new.
- Choose PyPI, package
ydata-sdk[mcp]==3.21.0(no quotes), repository empty. ThePIP_EXTRA_INDEX_URLvariable points pip to JFrog. - Click Install and wait until the status is Installed.
Image: installing the PyPI library on the cluster
Check it from a notebook attached to the cluster:
PDF reports and documents
The PDF report and DocumentGenerator need Chromium. For a one-off
session, run
%sh /databricks/python/bin/python -m playwright install --with-deps --only-shell chromium.
It is lost on restart; for regular use, add init_scripts/install_ydata.sh
from the installation folder as the cluster's init script.
4. Connect Genie Code
In the workspace, once per user:
- Open a notebook and open the Genie Code panel.
- Click the gear icon in the panel to open its settings. These are the panel's settings, not the workspace settings.
- Under MCP Servers, click Add Server.
- Choose Custom MCP server and select mcp-ydata. Do not use UC MCP Service: that option is for external servers registered in Unity Catalog.
- Click Save.
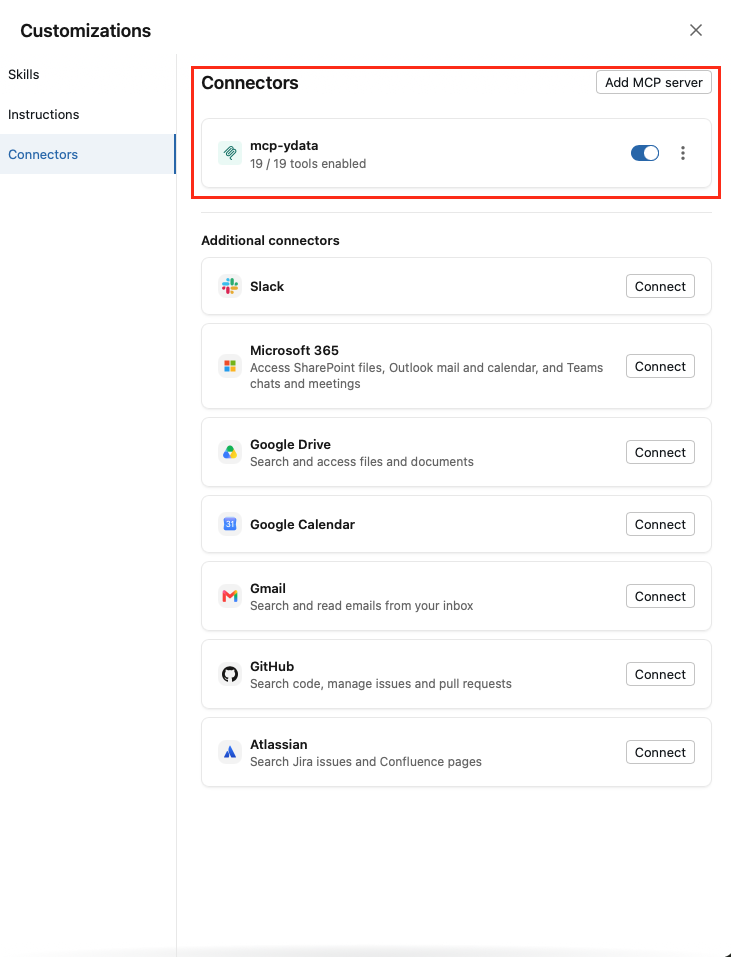
- Check that
mcp-ydatais listed with its tools switched on.
Right after a deploy, the tool list can take a minute to load: wait and reopen the settings before troubleshooting. Genie Code uses at most 20 tools across all servers, so switch off tools of other servers if needed.
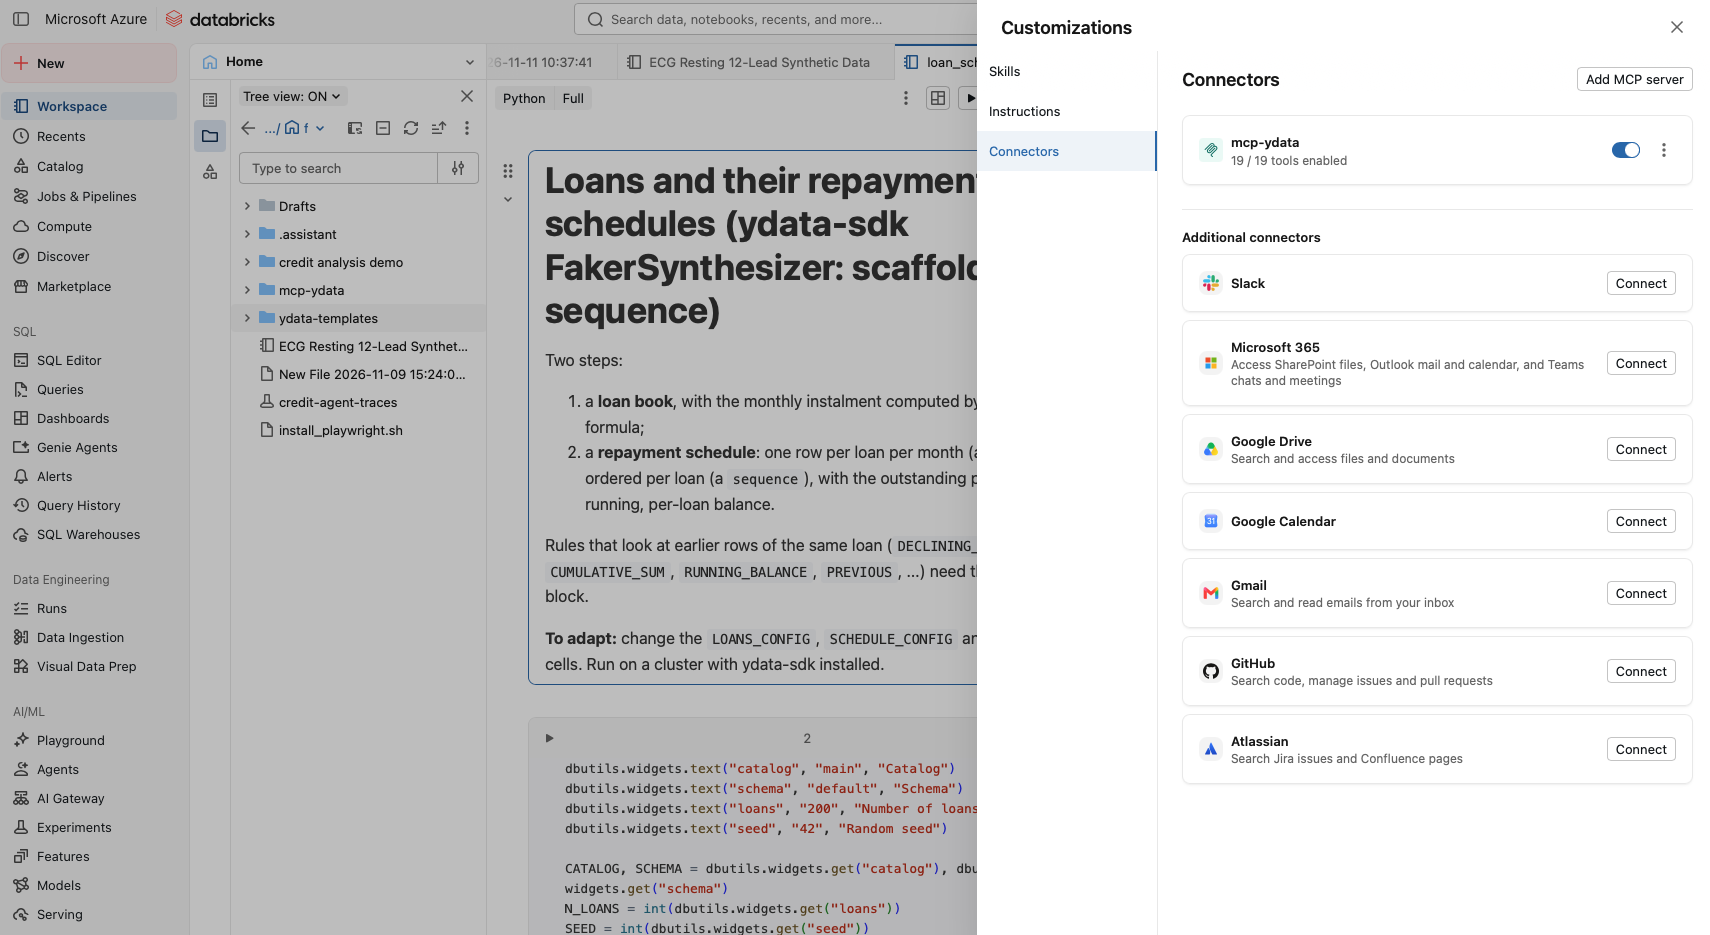
Image: Genie Code panel and its gear icon
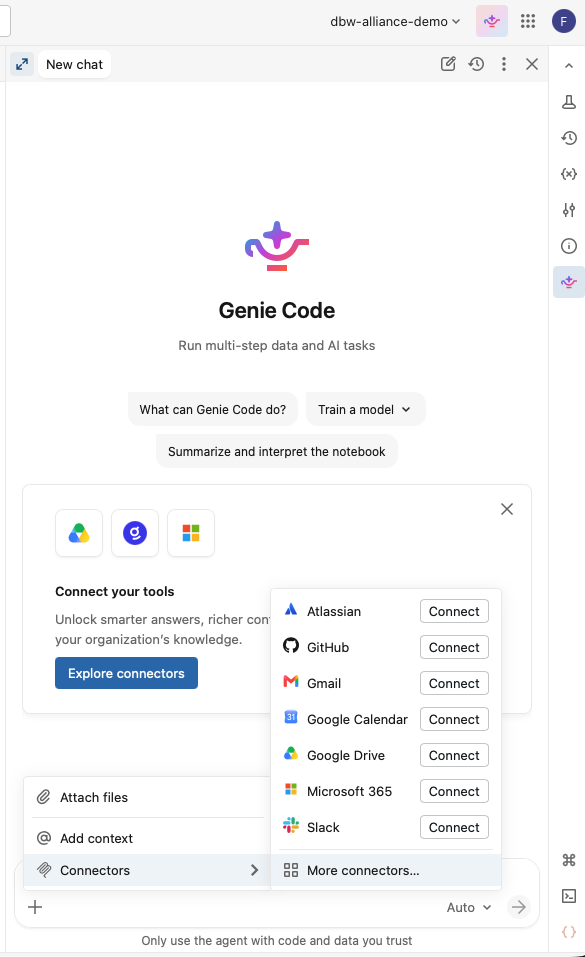
Image: Add Server > Custom MCP server > mcp-ydata
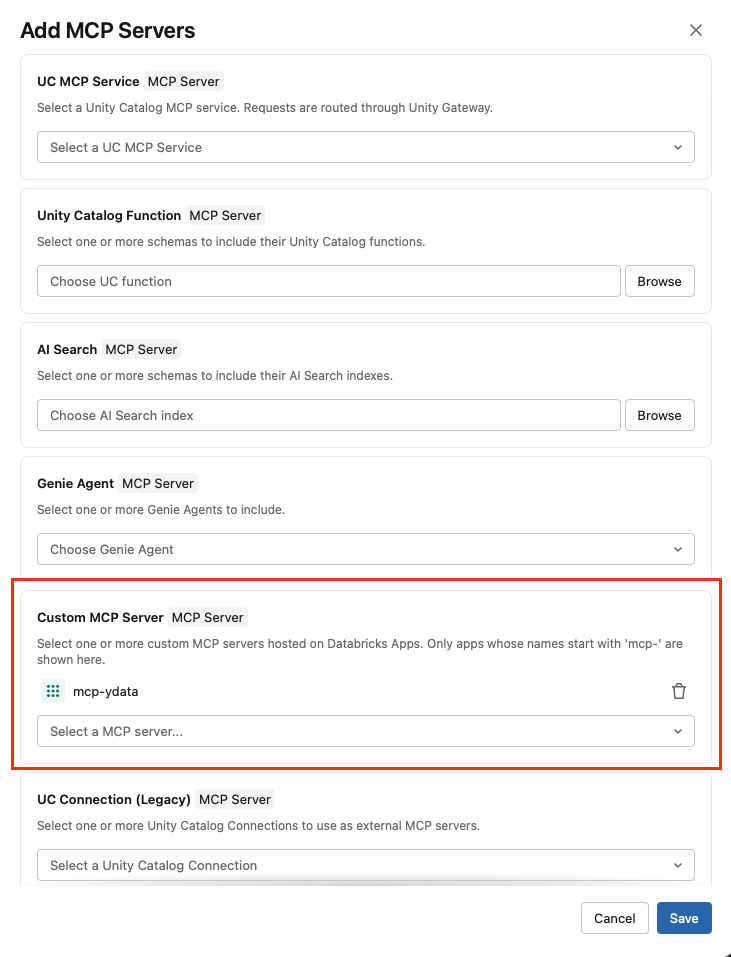
Image: mcp-ydata listed with its tools switched on
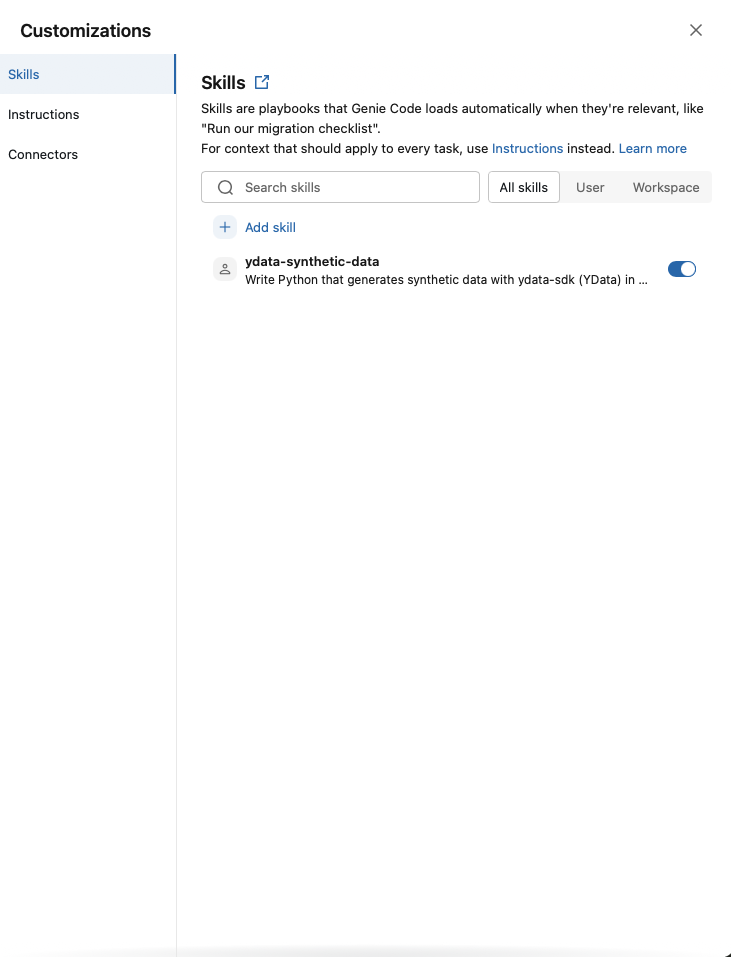
Check the skill
In the same settings, open Skills and check that ydata-synthetic-data is
listed. If it is not, hard-refresh the page and start a new conversation. The
templates are in /Users/<you>/ydata-templates (or /Workspace/Shared/ydata-templates
when installed for everyone).
Image: the ydata-synthetic-data skill under Skills
5. Use it
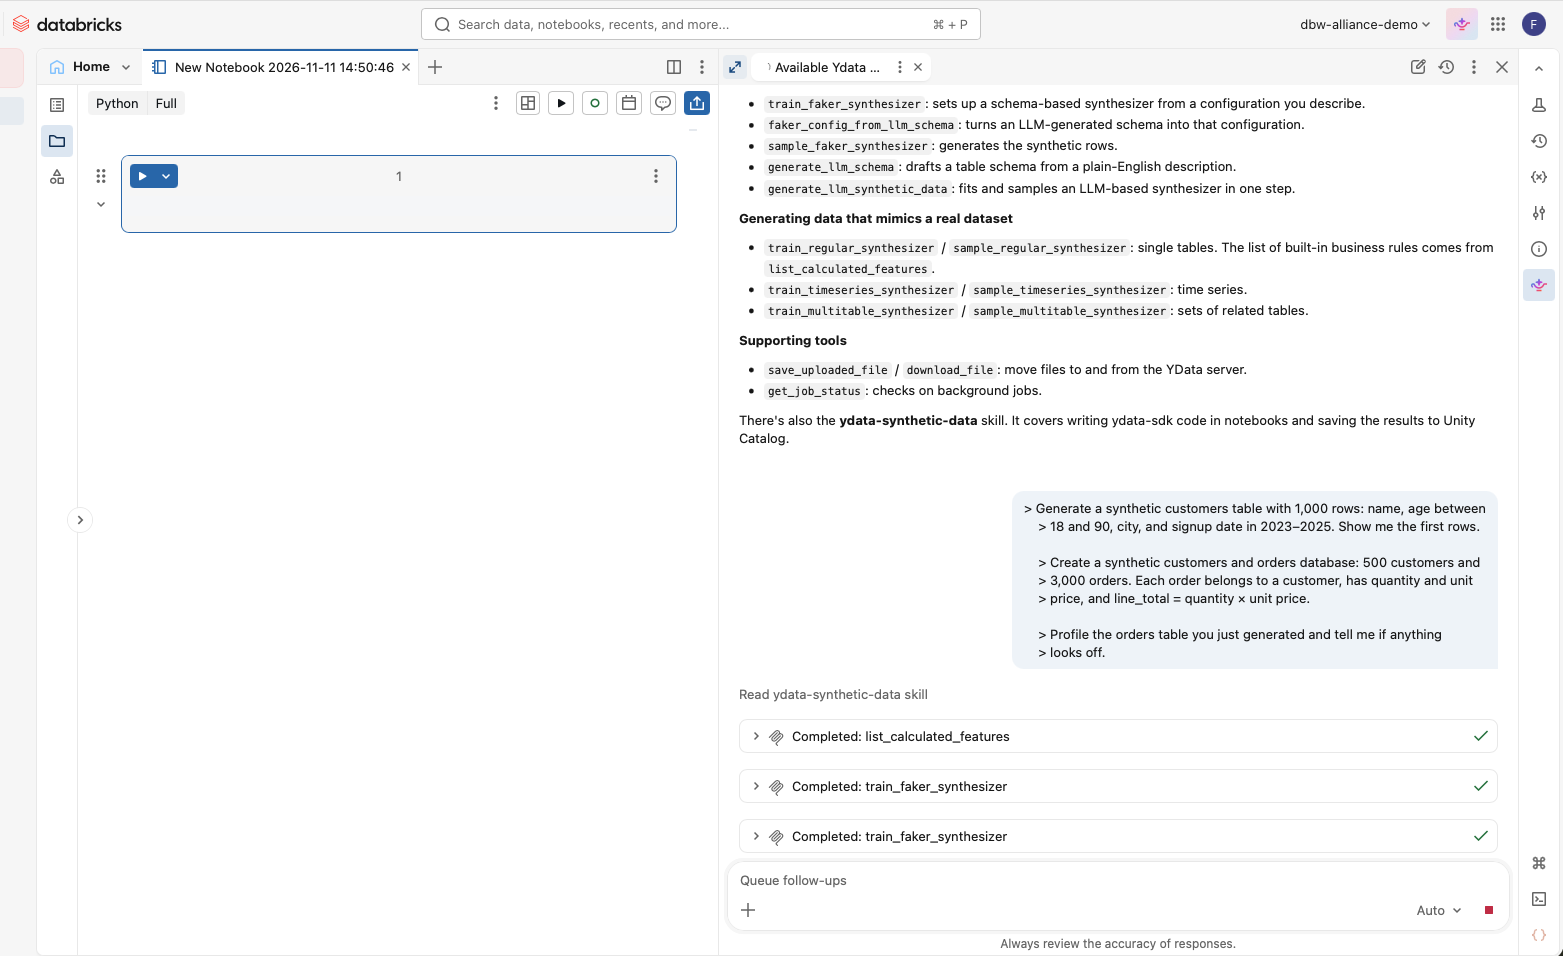
- In the Genie Code panel, set the mode to Agent. MCP tools are not used in Chat mode.
-
Start a new conversation and ask:
Which ydata tools do you have available?
-
Then try, in order:
Generate a synthetic customers table with 1,000 rows: name, age between 18 and 90, city, and signup date in 2023–2025. Show me the first rows.
Create a synthetic customers and orders database: 500 customers and 3,000 orders. Each order belongs to a customer, has quantity and unit price, and line_total = quantity × unit price.
Profile the orders table you just generated and tell me if anything looks off.
Genie Code may ask you to approve each tool call. You should see
train_faker_synthesizer, several get_job_status calls while the job runs,
then sample_faker_synthesizer. For the second prompt, the training call
should carry calculated_features for line_total.
To get a notebook instead of a result, ask for one, for example "…as a
notebook I can rerun, written to main.ydata_demo". Genie Code then starts
from a template and runs the code on your cluster. You can add @ydata-synthetic-data
to the prompt to make sure the skill is used.
Image: Genie Code in Agent mode calling the ydata tools
Generated files live on the App's disk and are lost when it restarts.
download_file returns files up to about 2 MB through the conversation; for
larger data, generate it on the cluster.
6. Stop the App when you are not using it
A running Databricks App is billed for its compute for as long as it runs, whether or not anyone calls it. Stop it when you finish working with the MCP server, and start it again next time.
Go to Compute > Apps > mcp-ydata and click Stop. Click Start to run it again.
What to know:
- Stopping keeps the App, its configuration and its permissions. Genie Code does not need to be set up again.
- While the App is stopped, Genie Code cannot call the ydata tools. Start it first, then wait about a minute before using Genie Code.
- Stopping drops train or sample jobs still running, and the files the App generated. Download what you need first.
- The skill and the templates keep working while the App is stopped: Genie Code can still write ydata-sdk code that runs on your cluster.
- Stop the cluster too when you don't need it, or rely on its auto-termination.
Reference
Day-to-day operations
| Task | Command |
|---|---|
| See state and URL | make status |
| Stop the App (stops billing) | make stop |
| Start it again | make start |
| List the tools | make tools |
| Update only the skill and templates | make skill |
| Upgrade ydata-sdk | make wheel, then make deploy |
| Change the exposed tools | Edit GENIE_TOOLS in app/app.py, then make deploy |
| Start over with new answers | make reset |
| Remove the local environment | make clean |
Redeploying or stopping the App drops train or sample jobs that are still
running. App logs: Compute > Apps > mcp-ydata > Logs. Every request appears
there, for example "POST /mcp HTTP/1.1" 200.
Troubleshooting
| Symptom | Cause | Fix |
|---|---|---|
databricks: command not found |
The CLI is not installed | Install it (before you start) and open a new terminal |
PermissionDenied: Invalid access token |
The SDK uses an old token | make login with option 1 (OAuth) |
OAuth authentication is required for MCP servers hosted on Databricks Apps |
make tools / make test with a token profile |
make login, option 1, new profile name (e.g. ydata-oauth) |
invalid requirement ... expected package name |
Curly quotes pasted into a command | Retype the command; no quotes are needed |
JFrog HTTP 401 |
Wrong JFrog email or token | make wheel again; generate a new token in JFrog if needed |
Python 3.10 or later is required |
Old system Python | brew install python@3.12, then make PYTHON=python3.12 install |
| Deploy fails | Dependency install or start error | Compute > Apps > mcp-ydata > Logs |
Genie Code: Failed to parse MCP initialize response ... Not Found |
Old app files deployed | make deploy |
mcp-ydata shows no tools in Genie Code |
The App is starting, or it is stopped | make start if stopped; wait a minute and reopen the settings |
| No MCP Servers section in Genie Code settings | Feature not enabled | A workspace admin enables it under Settings > Previews |
mcp-ydata missing from Custom MCP server |
No Can Use, or App in another workspace | make grant, or use the same workspace |
| No skills listed | Page not refreshed | Hard-refresh and start a new conversation; make skill if still missing |
| Genie answers without calling tools | Chat mode, or tools switched off | Switch to Agent mode; say "use the ydata tools" |
What the App does not cover
- Unity Catalog data from the App. The connector tools are not exposed. Read and write UC tables from the cluster instead.
- Documents and PDF reports from the App. They need Chromium, which the Apps runtime does not have. Use the cluster.
- Permissions of the calls. Tools run as the App's service principal, not as the Genie Code user.